Forest Lesson Plans
Emily Coletta
Learning Outcomes:
- Students will learn how to identify plants in a multi-modal fashion by engaging both with the senses and by learning botanical vocabulary
- Students will use these skills to learn the common plants of the redwood forest and beyond
- Students will understand these plant’s associated uses by humans
- Students will learn about the ethics of wild plant collection and wildcrafting
- Students will become aware of the natural hazards of being outside and of utilizing plants for consumption
Background Information:
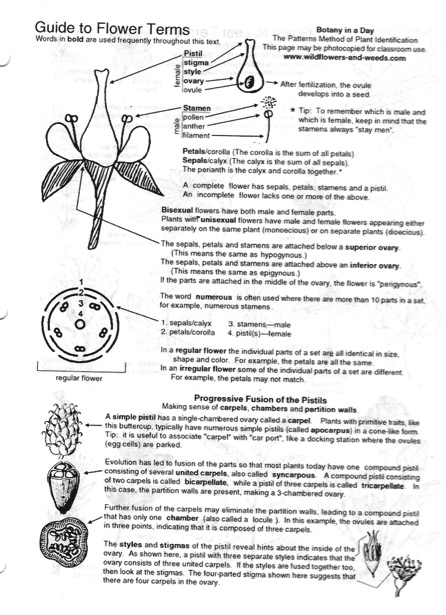
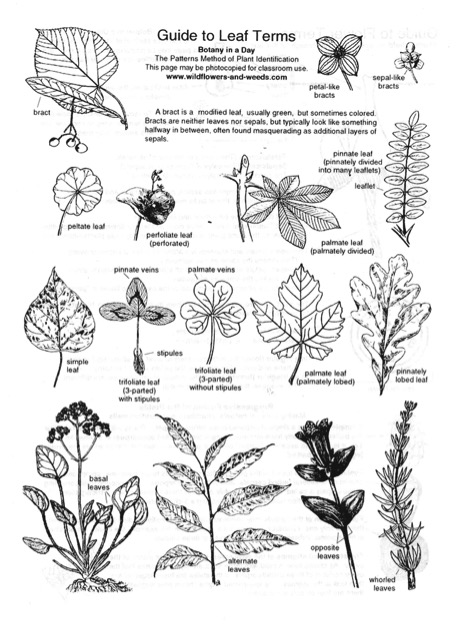
This module focuses on how to go about identifying plants and why we want to identify them properly. It is a good module to start a Natural History Club or another continuous learning experience, as it taps into people’s healthy fears of natural hazards and as well as their excitement about eating plants or using them medicinally (Young, Haas, McGown 2010). Because of this latter aspect of the module, it is especially important for the facilitator or mentor to know what you are picking. This module assumes confident identification of the following species: Sequoia sempervirens, Pseudotsuga menziesii, Acer macrophyllum, Notholithocarpus densiflorus, Umbellularia californica, Plantago lanceolata, Toxicoscordion fremontii, Allium triquetrum, Claytonia perfoliata, Toxicodendron diversilobum, Stachys sp., Clinopodium douglasii, Rubus sp, and Oxalis oregana. Calflora.org is a good place to look up photos of these plants if you are unfamiliar with them and the Jepson Herbarium centered at UC Berekely is available online at http://ucjeps.berkeley.edu/IJM.html. This site can be helpful for more precise botanical descriptions. To use the database, just enter the scientific name in the search bar. Some information about the medicinal use, edibility, or key identifying characteristics of each of these plants is provided in the plan of the day below. The plan of the day also includes notes about the ethics of wildcrafting, some botanical vocabulary, and natural hazards of the meadow area. A resource for basic botanical vocabulary is included below. This is a helpful guide to pass out to students in this module.
Materials:
- personal journals and pens or pencils
- water filter (or enough water from home to make tea for group)
- small camp stove and small sauce pan (or enough hot water in a thermos to make tea for group)
- edible plant collecting basket
- blindfolds
- olive oil or salad dressing
- forks
- Dixie cups (or lightweight mugs)
- honey
- Botany in a Day: The Patterns Method of Plant Identification by Thomas J. Elpel or other plant guide
Plan of the Day:
Northeast: A Closing and an Opening
Duration: 15 minutes
Sit on the hill just above the entrance of West Remote Parking Lot and summon students up the hill as they arrive with a coyote or raven call. Wait here until everyone has arrived. You can play a game in the meantime- have everyone find a rock and place it on the top of their hand. The object of the game is to knock off the other person’s rock without getting your’s knocked off. When everyone has arrived, explain that you are going to walk over to the top of the Mima Meadow across Empire Grade and start the day from there. Walking on the East side of the road, continue to the intersection at the entrance. Cross over to the meadow, hop the fence where there are wooden supports and walk up the single track to sit in the shade of one of the oak trees to your left or right. Sit down together and perform a greeting ritual- be that a gratitude circle in which everyone gives thanks for something or a long deep breath. Give everyone a chance to say their names, or their nature names if they wish.
East: Inspire: Stories and Wise Words
Duration: 5 minutes
Use this time to create excitement about the learning experience to come. You can share a story in which you subsisted off of wild edibles with great success or maybe a story in which you weren’t careful enough about your identification and ended up feeling ill. Any way in which you can express the importance of understanding hazards and identifying plants properly, and the excitement when you do it right, will work here. Alternatively, you can ask if anyone has had a wild edible experience and ask what that was like. Or, you can simply introduce the idea that nature can provide both medicinal and edible plants, but only if you know what they are and how, when, and where to look for them.
Southeast: Activate and Direct: Plan of the Day
Duration: 5 minutes
“Today we are going to learn the common plants of the area, how to identify them, and what use they have for human beings. To do so, we will collect a wild edible salad, learn about the medicinal uses of plants, learn about some possibly harmful plants, and then get to know some trees. We’ll start by walking along the meadow’s edge, then we will go down to the creek. In terms of natural hazards, as we go, we will be sure to keep our eyes out for poison oak. And, please do a periodic tick check of your ankles and your clothing. Although it is unlikely that we will see one, this is mountain lion habitat. If you see one, don’t run. Instead alert the rest of us and get as large as possible: open your jacket if you are wearing one or open your arms. Walk slowly away.” Now is a good idea also to ask if anyone is allergic to bees.
At this point, check for questions, some people are apprehensive about the idea of wild edible plants or have concerns about natural hazards.
South: Focus: Gathering a Salad
Duration: 45 minutes
Walk along the forest’s edge on the West side of the meadow along the foot path. Stop at a large patch of wild plantain (Plantago lanceolata). Sit down with it and have students explain what it looks like. Take what they have said and introduce the botanical words for what they are explaining. You can note the strong parallel venation on entire leaves. The flowering area is called an inflorescence. The leaves are basal and lanceolate (wider towards the middle). It is considered an invasive plant here, though it has uses for humans- it can be mashed into a poultice and applied to insect bites. I have used it as a poultice to sooth stinging nettle’s effects on my skin and a tea can be brewed from its leaves to remove splinters. The leaves are also edible in a salad. Have everyone collect plantain leaves into the collecting basket, encouraging everyone to only take a few leaves from each plant.
Continue walking down the path and stop at some Fremont’s star lily (Toxicoscordion fremontii). Again, sit down and have folks talk about what they notice. Then, introduce ideas about the flower: how there are both petals and sepals, how there are three petals and three sepals. Count the number of pistils and stamen, and explain what they are. Introduce how this plant is a monocot, or monocotyledon. Monocots produce only one cotyledon leaf and their flower parts tend to come in threes. Collect a few Fremont’s star lilies and carry them in your hands until the next stop.
Keep walking along the path until you round the bend. Where the bend turns South there should be a patch of wild onion (Allium triquetrum) as of March 2013. Have everyone pick some of the wild onion, but don’t tell them what it is called. Have everyone sit in a circle with their piece of wild onion. Walk around and pass out pieces of the Fremont’s star lily. Have everyone close their eyes. Tell them that one of the plants they are holding is a tasty edible, while the other one is deadly poisonous in large amounts. Ask them to try to sense which is which: really focus on the feeling that each is putting out. Have them raise the fist that has the one they feel is poisonous and open the respective palm and then open their eyes. See what plant people selected as the poisonous variety. Did more than half select the Toxicoscordion fremontii or did they select the tasty Allium triquetrum? Analyze your findings depending upon the majority of what people selected: could they sense, on some awesome, unknown level, what was poisonous? Could they not? Why might this be? Now, knowing that one is tasty and one is poisonous, compare the two plants. Note that these are both monocots and used to be classified in the Liliaceae family, so they will resemble one another. How can we tell the difference? One good way to engage in another sense is by smelling the wild onion. Reintroduce the importance of really knowing your plants and using many criteria (not just how they feel to you) to identify them.
Keep walking for a fair spell until the footpath empties onto a larger path where it meets with private property. Bear West on the path- just where the shade of the forest casts over the meadow, there is a nice patch of miner’s lettuce (Claytonia perfoliata). How is it similar or different from the plants that we have met so far? This could be a good time to use hand lenses to appreciate the flower parts. Let everyone know that it is edible and a good source of vitamin C, A, and iron and it was so popular around the Gold Rush that people brought its seeds back to Europe, where it is now naturalized. When collecting, think about the impact of your gathering, how much should we take? What parts of the plant should we harvest? Sometimes it is a good idea to collect the smaller, less productive plants from a stand, and leave the larger, more productive ones. Sometimes it is a good idea to harvest only about a quarter of the plant. With a plant like miner’s lettuce, which is a better idea?
South Part II: Undoing the Sea of Green
Duration: 30 minutes
Just into the woods after the gate, there is large, diverse patch of herbaceous plants on the left side. A few of these plants include: poison oak (Toxicodendron diversilobum), hedge nettle (Stachys sp.), yerba buena (Clinopodium douglasii), and blackberry (Rubus sp). Have everyone take out their personal journals and a pen or a pencil and choose a plant in this sea of green. Don’t have them pick the plant (it may be poison oak). Then, instruct everyone in how to do a gestural sketch. This is a fast sketch that simply catches the essence of the plant and its overall shape. Outline the shape of the plant with your pencil in the air a few times to get a sense of the structure of the plant. Then, quickly, draw it down on the paper. This is a technique used by science illustrators to get started with an illustration. Do this a few times with one plant and then move onto another plant.
When everyone has finished sketching, ask for a volunteer to show us one of their plants. Gather around the plant and take note of the leaf margin (is it smooth, dentate, serrate?) and the branching pattern (is it alternate? opposite?). Ask for another volunteer and continue this process until you have checked out all of the different types of plants. You can also note with each plant the leaf texture (is it glabrous or hairy? does it have spikes?) and invite people to smell the hedge nettle and the yerba buena. You can share that hedge nettle can be brewed into a tea to sooth migraines and hangover headaches and yerba buena can also be brewed into a tea to help with digestion. Both are members of the Lamiaceae or mint family- how are they similar, how are they different? Use this exploration of plants to also note the differences between poison oak and all the other green plants in the vicinity. Leaves of three, leave it be, if it is hairy, it’s a berry, if it’s shiny, watch your hiney: it’s no joke, it’s poison oak.
South Part III: Meet a Tree
Duration: 40 minutes
Backtrack a few steps to the gate and turn West down the slope. Follow the path that runs along the barbed wire fence, reminding everyone to be careful on the descent- it is steep and slippery. On the way down, you can show redwood sorrel (Oxalis oregana) and collect some for the salad. Don’t collect too much though: it does contain Oxalic acid which, in large quantities, can inhibit the uptake of calcium in the body. You can have everyone chew on some to get a sense of its lemony flavor.
Where the trail bottoms out at the creek circle up. Explain that we have been focusing on herbaceous plants, and now we are going to turn our attention to the trees, but we are going to do so in a different way. Have everyone find a partner and hand out one blindfold to each duo. Explain that one person will be blindfolded and his or her partner will lead him or her to a tree in the vicinity. The leader will first (gently!) spin his partner around and then bring his partner in a circuitous manner to a tree in the vicinity. If you are going to cross the river, make sure it is ok with your partner. Lead your partner in a way that is kind and cautious. Try not to talk. Also, don’t lead your partner into poison oak: if you aren’t sure it isn’t poison oak, don’t go there. Poison oak can also snake like a vine up certain trees, so make sure you are aware. Upon arriving, the blindfolded person then has to sense the tree without looking at it. She can feel the tree with her arms and face, she can smell the tree, she can listen for any birds that may be alarming from the tree, and she can taste the tree. Then, when she has a good sense of the tree, her partner leads her back to where they began. She removes her blindfold and then has to find her tree once again. Repeat this process with the other partner.
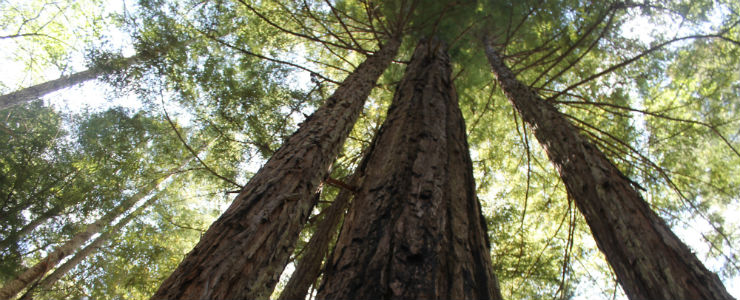
After everyone has sensed and rediscovered their tree, ask for volunteers to show us their trees. Have everyone gather around the tree and see if anyone knows what kind it is. Then, have the volunteer describe their experience of sensing the tree and then collectively describe its bark and leaf shape. Have another volunteer, who had a different tree, lead us to their tree. Repeat until you have identified and experienced all of the different trees. Some of the trees include in this area include: the redwood (Sequoia sempervirens), the Douglas-fir (Pseudotsuga menziesii), the big-leaf maple (Acer macrophyllum), the tan oak (Notholithocarpus densiflorus), and the bay tree (Umbellularia californica). Note that the redwood has spongy, reddish bark that runs in deeply parallel grooves, while the Douglas fir is more gray, firm, and has a more scumbled, rough bark surface. Note too the differences in how the needles come off of the stem- the redwood is plane, while the Douglas-fir tends to come out in all different directions. Consider how the maple has palmately lobed leaves (most of which, in March, are dried up brown remains on the forest floor), while the tan oak and the bay have entire, simple leaves. Note the “parking lot” like venation of the tan oak and the lanceolate shape and fragrant scent of the bay leaf.
Southwest: Take a Break: Tea Time
Duration: 15 minutes
Lead everyone down the stream to the large swimming hole and sand bar. Invite everyone to take a break at this point- they can watch the fish in the hole or simply sit back and listen to the river or have a snack and some water. While folks are relaxing, run some stream water through a filter into your sauce pan. Set up your campstove and put the water on to boil. Collect some redwood or douglas fir tips and put it into a tea infuser or take a pre-prepared redwood tips tea infuser out of your bag. Place the infuser into the water and let it steep for a few minutes. Sweeten with honey and pour into interested people’s cups. Alternatively, you can make the brew at home and bring it in a large thermos. You can let folks know that that redwood needles are high in Vitamin C and the tea acts as an expectorant, helping to bring up and clear out mucus. It also can help with respiratory infections. Along with the tea, dress the salad and give everyone forks. Have everyone sit in a circle and pass the salad.
West: Gather and Share: Joyous Learning
Duration: 10 minutes
From this eating circle, have everyone share something that they learned today or the favorite part of the day.
Northwest: Reflect: Where can we grow?
Duration: 5 minutes
Pose the question for personal reflection: what happened today that made you uncomfortable, scared, nervous, or excited? Was it when someone lead you blindfolded across a creek? Or when you ate something wild harvested? When you got overwhelmed by plant terms and names? Let them know that they will have an opportunity to reflect on this in their field journal assignment.
North to Northeast: Integrating and What is to Come: Club Logistics
Duration: 10 minutes
If this is for a natural history club or class, now is a great time to hand out the syllabus or list of club expectations and meeting locations along with their first field journal assignment and a description on how to write in a field journal. This assignment asks students to find a sit spot. At this sit spot, they are to find four plants they are unfamiliar with and draw and describe them with botanical language. It also asks for them to reflect on the relationship that they have with plants as well as the relationship they have with natural hazards. After handing these out, ask if there are any questions. After answering questions, have everyone take three deep breaths (we can do this!) and end the learning experience here. Walk back to the meadow together.
Northeast for Instructors: Review field journals
What does each student’s field journal tell you about themselves? About their hesitations? Their strengths? Their excitements and fears? This first class is a tender new beginning: where do those you mentor start?
Bibliography
Elpel, Thomas J
2004 Botany in a Day: The Patterns Method of Plant Identification. Pony, Montana: HOPS Press, LLC.
Young, Jon, Ellen Haas, and Evan McGown
2010 Coyote’s Guide to Connecting with Nature. Shelton: Owlink Media Corporation.
Emily Coletta
Learning Objectives:
- Students will come to appreciate Sequoia sempervirens as a heritage species, or a species that has great importance to the land and to our culture
- Students will learn the characteristics of an old-growth redwood forest
- Students will learn about the ways in which redwood trees both create and interact with their environment
- Students will learn about the myriad ways that redwoods both reproduce and survive
Background Information:
Given that this learning module is scheduled for the end of the Experiential Ecology Club, a lot of the activities involve students coming up with their own observations and hypotheses about how redwoods work. That being said, it is helpful to know the following information about redwoods and old growth to help guide discussions.
To begin, old growth groves have particular characteristics. Old growth redwood groves may have: lots of fallen nurse logs, irregularities in the crowns, fire scars, reiterated trunks, standing dead snags, lots of big trees compared to the amount of mid-sized trees, and a relatively uniform understory in terms of species composition (Singer, n.d.). From personal observation, the bark of redwoods is much harder and more solid than second growth redwood trees.
The presence of redwoods radically alter their environment. Old growth redwoods groves in particular host an extremely high diversity of soil microbes, fungi, bacteria, and mites which are instrumental in nutrient cycling, plant’s water uptake, and protecting plants against diseases (Singer, n.d.). Redwoods also facilitate the capture of fog and this fog water accounts for significant amounts of both redwoods and understory plants’ water budget. In one study, fog water during the summer accounted for 19% of the redwoods water use and 66% of understory plant’s water uptake (Dawson 1998). In this way, redwoods create their environment.
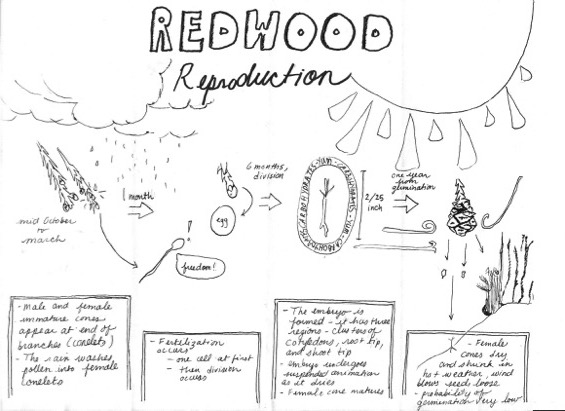
Redwoods are diecious conifers, meaning that they house both male and female cones on the same tree (Barbour et al 2001). Male and female cones grow on the end of different branches. Conelets (little immature cones) appear from mid-October to March. Pollen from the male cone inseminates the exposed ovaries of the open female conelets. Pollination occurs during the rainy months of late fall and early winter. In pollination, sperm and egg unite and make one cell which then divides, eventually creating an embryonic seedling with a microscopic “root, shoot tip, and cluster of two to five needle-like seed leaves called cotyledons” (20). The embryo matures in six months, is 2/25th of an inch long, and is surrounded by carbohydrate rich tissue. Female cones, full of these embryos, mature through spring and summer. The embryo dries, ceases cell division, and awaits appropriate conditions for germination. In late summer, the female cone is ripe: it dries and shrinks in the hot weather and opens its scales to the wind which may dislodge the mature seeds inside. The seeds don’t have wings and therefore do not go very far (200 to 400 feet from the tree typically). The female cones shed their seeds from September to early summer, although the most intense period is November to February and the exact timing varies depending on location. Redwood trees produce a massive amount of seeds: an average of 10 million seeds per tree, but only 5-10% of these seeds are viable. A large reason for low viability is the presence pathogenic fungi, disease, or cone moth larvae invasion of seeds (Barbour et al, 2001).
In the event that a viable seed does drop from a female cone, there is still the difficult task of germination (Barbour et al, 2001). During germination, the embryo secretes enzymes that digest the food tissue of the seed. Then, the seed coat softens, splits and the root tip goes into the soil. Within a day, it penetrates an inch of soil. The cotyledons, shoot tip and seed coat then advance above the soil surface. This germination is highly unlikely in the redwood forest. Drought, herbivory, or fungal disease can prevent germination, as can the dry, nearly impenetrable duff. Redwood germination is most successful on mineral soil. Disturbances that reveal this soil (low intensity fire, floods, tree falls, landslides) are therefore beneficial to successful germination and longevity (Barbour et al, 2001).
When a seedling has successfully germinated, its growth begins. Its rate of growth largely depends on light and moisture availability. It can’t be too dry or too shaded. However, redwoods are extremely shade tolerant. In fact, “A redwood seedling can survive for months in shade so dense that 99.4% of sunlight is filtered out- although it will eventually die under these extreme conditions” (Barbour et al, 2001: 23). In deep shade, saplings grow slowly. When a tree falls and light penetrates, these saplings grow quickly. When the older branches of saplings get shaded out, they drop off as the tree ceases supplying nutrients to this area. Redwoods gain most of their height early in their age (at 20, redwoods average 30 feet and can add two to six feet in height, at 50 years old, it can be 100 feet). When the redwood reaches the canopy, the stem tip is in less favorable conditions (there is lower humidity and it is hotter with more wind) and may only add a few inches a year; growth is concentrated instead in widening the trunk (aka bole) (Barbour et al. 2001). This bole growth happens in the cork cambium and the vascular cambium, where cell division occurs. The cork cambium produces the outer and inner bark. The outer bark protects the tree from temperature fluctuations, insect infestations and the inner bark “stores nutrients for tree growth and sustenance” (25). The vascular cambium produces sapwood: this sapwood contains water conducting cells (the inside layer) and sugar-conducting cells (the outside layer). These sugar conducting cells are alive and they take sugar from the leaves to “shoot tip, cones, roots, and other places where it is used as an energy source” (26). The water conducting cells eventually cannot transport water any longer and fill with decay and insect- resistant organic compounds and thus become heartwood. The wood also contain tannins and phenolics that protect the redwood from insects and microbes (which find it hard to digest). Underground, the growth of the redwood is shallow and widespread: its roots usually reach no deeper than 12 feet, but they may spread up to 50 feet in diameter. The roots in some areas are thick. In the top three feet of soil, the roots are more thin and form a fibrous, dense root mat. The roots of neighboring redwoods may interlock and stabilize the trees.
The redwood has many ways to survive the effects of disaster. The bark, in its thickness, insulates the tree from the heat of a fire and, in its lack of resins and volatile oils, doesn’t burn well. Redwoods can also “sprout from dormant buds in its burl, trunk, or limbs” (28) when the tree is injured. The burl is composed of thousands of dormant buds. The tree produces growth regulators which keep these buds dormant, but when damage occurs, these buds come out of dormancy, break the bark, and become a shoot. These shoots are genetically identical to the tree from which they sprang. If these shoots come from the bud collar around the base of redwood, they grow up into a fairy ring. Should the fire be relatively cool, mature trees can survive. These trees may show signs of fire scarring and will slowly grow their bark around the wound. Should the fire turn into a crown fire, mature trees will likely perish. While this kills the tree, the root system and burl can survive as the soil insulates from the heat of the fire. When it may be 1000 degrees Fahrenheit above ground, it can be a cool 150 degrees below the soil (Barbour et al, 2001). Despite these adaptations to fire, redwoods can die when a flood or winds topple the tree, ripping the roots and burl from the ground. Long lasting floods can suffocate roots and thus destroy the water transport system. Hot fires may girdle the cambium- carbohydrates can no longer reach the roots (Barbour et al, 2001).
For more information about the natural history of redwoods, check out Coast Redwoods: A Natural and Cultural History (Barbour et al, 2001). The information above between the in-text citations comes from this text.
Pictorial timeline of redwood illustration, personal illustration (based on information in Barbour et al, 2001):
Materials:
- flashlight
- students own individual journals
- vial, water, and immature female redwood cone
- print-outs of redwood reproduction worksheet
Plan of the Day:
Northeast: Open the Learning Experience
Duration: 5 minutes
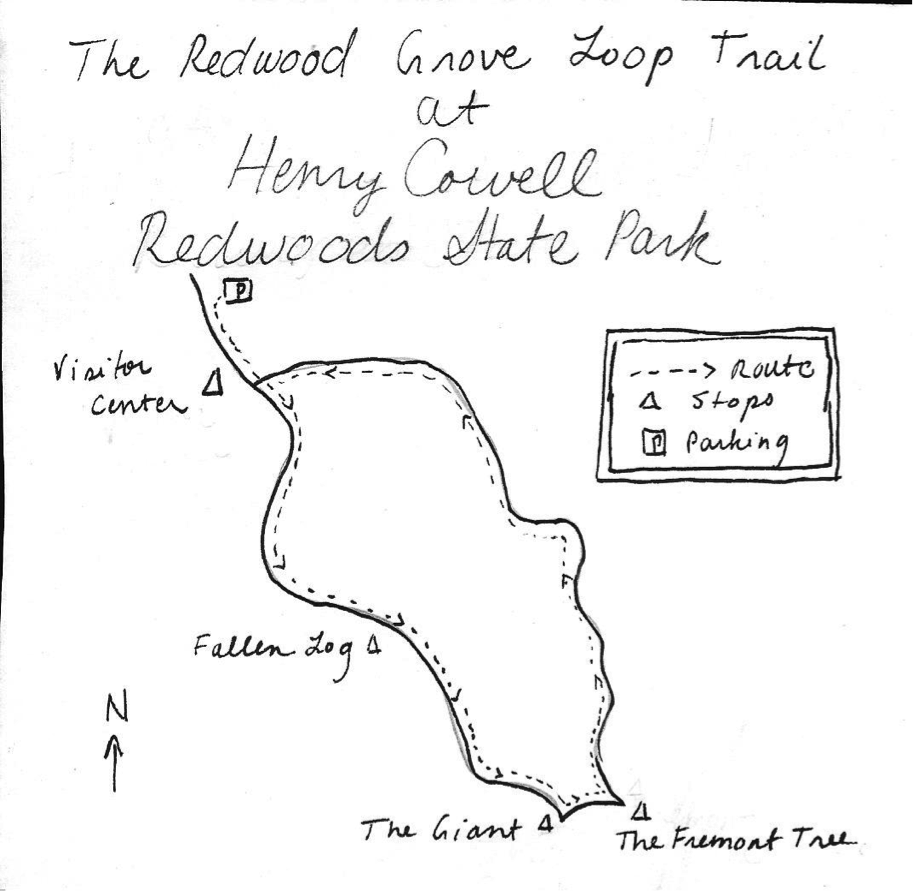
Come to a quiet place, such as the back deck of Henry Cowell’s visitor center and gather in a circle to check in and share gratitude.
East: Inspire
Duration: 5 minutes
Have students first close their eyes and take a few deep breaths. Have them open their eyes as if this is their first time in the redwoods and look all around them. What do they feel? What do they notice? Share with them that these trees are extremely old, that they germinated around 1,400 to 1,800 years ago. These trees are our heritage species and we can learn a lot from them.
Southeast: Direct and Activate
Duration: 5 minutes
Explain that we are going to walk through the old growth grove with an eye towards the unique ways in which redwoods trees, especially old growth stands, interact with and create their environment. Walk to the entrance of the grove.
South: Focus
Small Group Observations:
Duration: 25 minutes
Break the group into groups of 3. Each group is responsible to note how this forest feels, looks, smells, and sounds similar or different to second growth forest. Each group should have a scribe who is responsible for noting down observations: observations can include personal as well as ecological reflections. Encourage everyone to walk as slowly and quietly as they can and tell everyone to use all of their senses. We are going to share our observations at the end of this portion of the walk. When you get about half-way to the Giant (tree #7 on the redwood loop) next to the dead fallen redwood log, have students sit in a circle and share their observations. Some concepts you can draw out if they haven’t already been mentioned: old growth groves are characterized by lots of fallen nurse logs, irregularities in the crowns, fire scars, reiterated trunks, standing dead snags, lots of big trees compared to the amount of mid-sized trees, and a relatively uniform understory in terms of species composition (Singer 2009).
A Grove that Sways Together, Stays Together:
Duration: 10 minutes
Explain that what everyone has shared are visible or otherwise “sensable” characteristics of the redwood forest. There are other characteristics which are less immediately evident. Have everyone think what these might be as you walk to The Giant. Then, lie down in a circle, looking up at the canopy above. Referencing the soil beneath your backs, you can talk about the shallow, interlocking root system that characterizes redwood groves. In addition to this activity underground, old growth redwoods groves are also characterized by a high diversity of soil microbes, fungi, bacteria, and mites which are instrumental in nutrient cycling, plant’s water uptake, and protecting plants against diseases (Singer n.d.). Aboveground, the structure of the redwoods facilitate the capture and drip of fog. This fog water accounts for significant amounts of both redwoods and understory plants’ water budget. Here, you can cite the study indicating that fog water during the summer accounted for 19% of the redwoods water use and 66% of understory plant’s water uptake (Dawson 1998).
Getting to Know our Heritage Species: The Redwood Tree:
Duration: 20 minutes
All of the characteristics of grove behavior, both seen and unseen, are only made possible by the redwood tree itself. This activity allows you to cover the reproductive strategies and properties of the redwood trees as dictated by the interest of the group. Have each student go out and find one redwood tree to observe. They have these questions to answer: how does their tree reproduce? At what point in their reproductive cycle are they? Is there any evidence for how their tree can withstand disaster? They can write, draw, compose a poem, a skit, a monologue, anything they please to reflect on their one tree. They are to come back when you howl like a coyote.
Southwest: Take a Break
Duration: 10 minutes
Gather together at the picnic benches at the Fremont Tree. You can provide a flashlight and allow students to adventure into the dark, hollowed out center of the Fremont Tree.
West: Gather and Share
Duration: 15 minutes
When gathered back together, have students share what aspect of the redwoods they focused on and what they learned. If they wrote or drew something, encourage them to share it. This is a good time for you to share the redwood reproduction hand-out or do the immature female cone trick (place green cone in clear vial with water and shake to see the red tannin stain). It is also a good time to chime in on the particularities of redwood reproduction, growth, and physiology as outlined in the Background Information section.
Northwest to North: Integrate and Introspect
Duration: 20 minutes
Introduce that we are going to do a solo walk for the the second half of the grove so we can take in the experience of the old growth grove in our own unique ways. Encourage folks to move slowly and to take everything in. Let people know that those who finish the walk first can visit the visitor center until we have all assembled back together. Release students a minute apart. Hopefully this can be a time for students to think on what they have learned and apply it to both what they are seeing in the grove and what they are experiencing in life.
Gather all students at visitor center and return to vehicles in parking lot.
Bibliography
Barbour et al.
2001 Coast Redwoods: A Natural and Cultural History. John Evarts and Marjorie Popper, eds. Los Olivos, CA: Cachuma Press.
Dawson, T.E.,
1998 Fog in the California redwood forest: ecosystem inputs and use by plants. Oecologia (117): 476-485.
Singer, Steven
n.d. Old Growth Forests of the Santa Cruz Mtns: A Rare and Valuable Resource. Santa Cruz Mountains Bioregional Council. Http://www.scmbc.net/ogforests.htm, accessed 25 May 2013.
Singer, Steven
2009 Characteristics of Old Growth Redwoods. Santa Cruz Mountains Bioregional Council. Http://www.scmbc.net/ogforestarticle2.htm, accessed 25 May 2013.
Jack Mazza
Natural History of UCSC Field Group Introduction to Natural History
Nat Sci 2 Room 229/ Upper Campus Walk
9:00am Meet at museum 9:05am
- Intro: Welcome! Describe my senior thesis. Small scale: my own interest in how natural history education affects students during this time in our life. Large scale: the importance of this type of education during modern times. What we’ll be doing today.
- Names go around. Questions to ask: What year are you? What part of the natural world has really caught your eye and mind? (i.e. birds, plants, butterflies, lizards, etc...)
- What is natural history? Give some definitions from syllabus. What it means to me. 9:20am Go over syllabus and assignments. Logistics: every class is outside bring
appropriate gear. Attendance! Enrollment codes.
9:30am Questions
9:40am Journalling basics: What is a field journal? How to take field notes, etc. Why keep a field journal? Headings.
10:00am (ish) Go over “Where we are in California” Use map to illustrate where we are. 10:1530am Walk to forest. Once in forest, do sense meditation. Into “Thinking Like a
Naturalist” activity. Teach people about “spinning the wheel” and observing. Then group people up (34 people per group) and have them find a nearby organism to spin the wheel about/make observations and write them down in their journals/piece of paper if they don’t have their journals.
11:00am Game! Camouflage / Stalking game. 11:20am Walk back to museum
Jack Mazza
Natural History of UCSC Field Group Trees of Upper Campus
Nat Sci 2 Room 229/ Upper Campus Walk
9:00am Meet at museum (Get tree field guides) and give out survey 9:15am Make sure everyone is here and leave when everyone is.
Walk to Upper Campus
9:25am Circle up. Check in: Gratitude circle. How was everyone’s first week? Any journal sharings? Exciting observations?
9:40am Walk and talk
Plants to cover:
▪ Coast Redwood Sequoia sempervirens
▪ DouglasfirPseudotsuga menziesii
▪ Tanoak Notholithocarpus densiflorus
▪ Hairy Honeysuckle Lonicera hispidula
▪ Huckleberry Vaccinium ovatum
▪ Poison oak Toxicodendron diversilobum
▪ Redwood sorrel Oxalis oregana
How to identify these species, what characteristics do they have?
Go over all the characteristics of these plants. Encourage note taking!
10:30am Play “Identification game” from Sharing Nature with Children. D uring the walk, collect samples of all these plants (minus P. oak).
“Form two equal teams and line them up facing each other, 30 feet apart. Put the plant specimens in a row on the ground between the two teams. The team couts off separately, so that each player has a number, and on each team there are players numbered one, two, etc. When the teams are ready, call out the name of a tree or bush represented by one of the specimens lying between the teams, then call out a number.”
11:00am Depending on location, we may want to walk back now…
Towards a Deeper Understanding: Flora of the Redwoods and Beyond
Redwood and Old Growth Intensive
Upper Campus Walk
Trees of Upper Campus Walk
